

The Pikes Peak Highway presents breathtaking scenery along the 19-mile trip to the summit. The terrain and scenery varies widely, so we’ll break it down into four sections for you.
Highway 24 to the Tollgate
Tollgate to Crystal Creek Reservoir
Crystal Creek Reservoir to Glen Cove Inn
Glen Cove Inn to Summit
Welcome to the Pikes Peak Highway!
Highway 24 to the Pikes Peak Tollgate
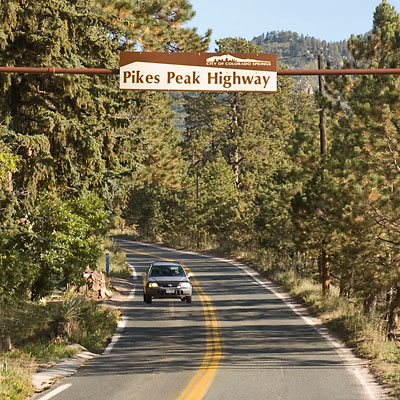
When you exit to the south from Highway 24, Fountain Avenue will take you to the right as you proceed. You’ll pass several small businesses and homes on both sides of the two-lane road. In about a half mile, you’ll come upon the overhead sign shown in the photo to the right.
Continue under that sign and head up the hill. You’re now on the Pikes Peak Highway!
In about another half mile, you’ll pass the North Pole amusement park on your left. The tollgate to the Pikes Peak Highway is only a quarter mile ahead.
When you pull into one of the lanes at the gate, friendly rangers will greet you, accept your toll fees (cash and credit cards accepted), and provide you with a printed map and brochure.
Be sure to ask the rangers for a copy of the Audio Tour of Pikes Peak – America’s Mountain.
Pikes Peak Tollgate to Crystal Creek Reservoir
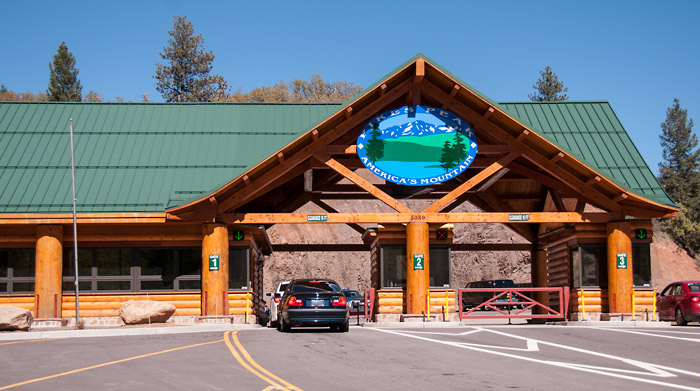
Pikes Peak Highway Toll Gate
As you depart the tollgate area, you’ll soon take a fairly sharp left turn and start up a relatively steep hill. You’re now in the Montane Life Zone, which starts at about 8,000 feet.
You’ll soon come upon the first overlook on the highway. This overlook is called Camera Point, and provides a great and expansive view to the east down through Ute Pass. Because it is on the left side of the road, we encourage you to stop on the way down the mountain to take in the view.
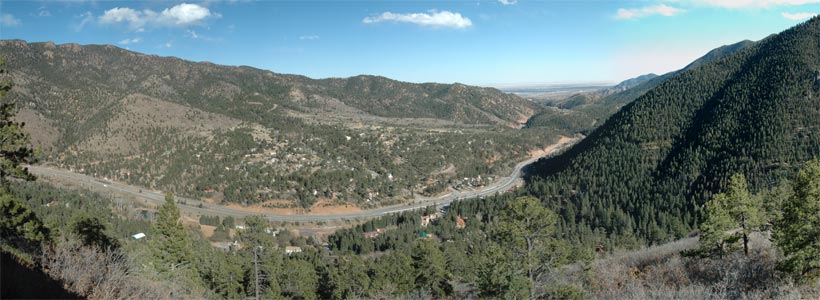
Panoramic view of Ute Pass from Camera Point Overlook
After passing Camera Point, you’ll continue up a slight grade with several turns and then start heading more west. Shortly after Mile Marker 2, you’ll get your first glimpse of Pikes Peak while on the highway. Watch for a large rock on the left side of the road to mark this point.
Soon after, you’ll reach the Crowe Gulch Picnic Grounds on your right. This area has restrooms, non-potable water and several picnic tables. There are also a couple of trails that lead out from the back of this location. If you want a quick hike, take the trail to the left and branch off to the left again after only a hundred yards or so. That will take you up to some rocks that provide a good view of the highway and the summit of Pikes Peak.
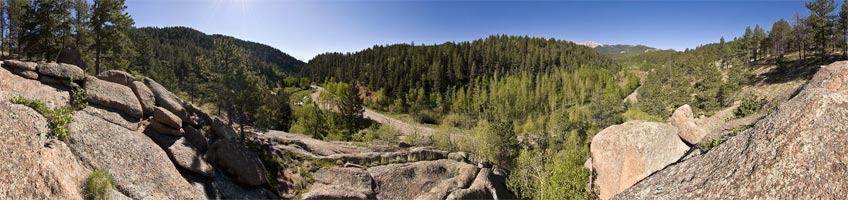
View of the Pikes Peak Highway from a trail above Crowe Gulch Picnic Area.
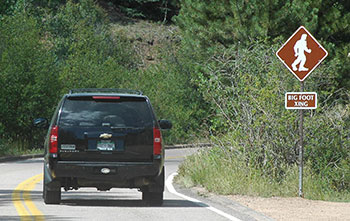
Big Foot Crossing Sign on the Pikes Peak Highway.
Once you return to the highway, you’ll soon enter the Pike National Forest. Keep your eyes focused on the right side of the highway just after Mile Marker 3 so you don’t miss the Big Foot Crossing sign. This sign was placed on the highway to mark the approximate location where a visitor spotted a Big Foot like creature in 2001. (More about Big Foot and Pikes Peak can be found on the Fun Facts page.)
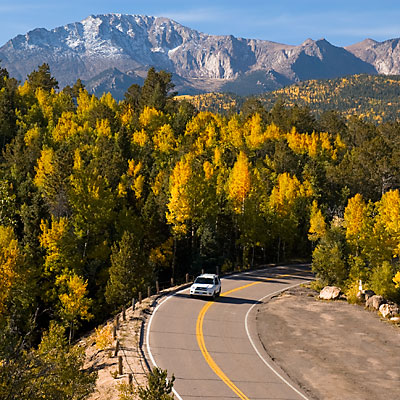
Aspens on Pikes Peak near Crystal Reservoir in the Fall
The next couple of miles of the Pikes Peak Highway continue to wind gently through Aspen forests with only a slight gain in elevation. If you’d like to get out and take some photographs (especially in the fall) or just stretch your legs, there are a few pullouts where you can park your car. There is also trailhead at the pullout near the 4.5 mile point.
Soon, the highway will turn back to the north (right) at which time you will be paralleling the east shore of Crystal Creek Reservoir. This reservoir provides water to the City of Colorado Springs.
At Mile Marker 6, you’ll find a small parking lot on the left, where access to some great pictures (and possibly fishing) begins. The photo on the right was taken from the hillside to the east of that parking lot, looking southwest towards the summit of Pikes Peak.
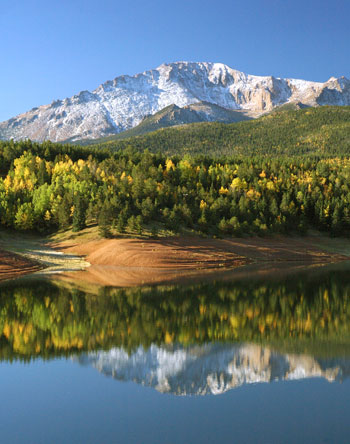
Reflections of Pikes Peak in Crystal Reservoir.
As you pass the parking lot, the road will turn to the left and you’ll soon drive over the dam at the north end of Crystal Creek Reservoir. The Crystal Creek Visitor’s Center is on your left after you cross the dam. Plenty parking is available.
The views afforded from this location are phenomenal, especially in the fall when golden aspens set the hills ablaze in yellows and oranges. This is a must-stop-and-soak-in-the-view location!
From this location, you can walk down to the reservoir’s edge, take a self-guided nature walk or shop in the gift shop. You can also cast your line in the water to catch some fish. (see Fishing on Pikes Peak for more info.)
Crystal Creek Reservoir to Glen Cove
After you pass the Crystal Creek Visitor’s Center, you’ll start a gentle climb towards the summit.
In less than a mile on your right, you will see the entrance to the North Slope Recreation Area. If you take this exit, the unpaved road will lead to the North and South Catamount Reservoirs, at which you may have a picnic lunch, go fishing, or take one of the many trails for hiking or biking.
Right after the turn-off for the North Slope Recreation Area, you’ll pass the starting area for the Pikes Peak International Hill Climb or “Race to the Clouds” as it was once called. Keep this point in mind as you continue up the highway so you can see for yourself what the racers might be feeling as they proceed up the mountain at incredible speeds and reach the summit in as little as ten minutes from this spot.
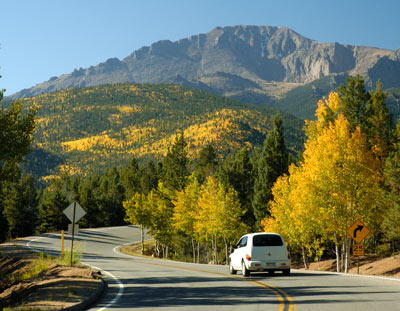
Fall colors on the Pikes Peak Highway
The highway starts to twist and turn more as your proceed up the steeper grade of this leg. You’ll soon lose sight of Pikes Peak again, however, one of the best locations for viewing the peak with a foreground of fabulous fall foliage is just ahead on your left, between Mile Markers 7 and 8. This location is called the Peak View Photo Stop, but you won’t find any signs with that label. (The photo to the right was taken shortly before this pullout.)
Between Mile Markers 9 and 10 is the Halfway Picnic Ground. This location has numerous picnic tables, restrooms and several interpretive signs. Several trails are also accessible from this location.
Near Mile Marker 10, you’ll be entering the Sub Alpine Life Zone. Between Miles Markers 11 and 12, the parking area for the former Glen Cove Ski Area will be on your left. The ski slopes have been replanted, but as you look at the hillside, you can clearly see where they once were.
Several more switchbacks and you’ll soon be approaching the Alpine Life Zone and the historic Glen Cove Inn. Please drive carefully around this location as many pedestrians may be crossing the Highway.

The Glen Cove Inn on the Pikes Peak Highway
Glen Cove Inn was originally a cabin settled by Frank Tweed in 1886. He later developed the cabin into a way station for travelers up the original carriage road. Though it has been completely rebuilt, the foundation of Tweed’s cabin is still part of the construction.
Today, the Glen Cove Inn offers travelers a gift shop, restaurant and restrooms. In the summer months, rock climbing lessons and panning for gems may also be offered.
On the way down the mountain, drivers are asked to stop at Glen Cove to have their brakes’ temperature checked by Rangers. This is done to ensure your safety as you continue your descent.
Glen Cove to the Summit of Pikes Peak
If you thought the drive to this point was good, just wait for the outstanding views that are just ahead!’
As you continue to the summit from Glen Cove, you’ll soon find yourself nearing tree line. The altitude, amount of water and the wind make it nearly impossible for any upright plant to grow. For those last few trees that do manage, they are often very deformed, looking almost like flag trees or “krummholz” – the German word for “crooked wood.”
Just before Mile Marker 14, you’ll see a gate on the left (north) side of the Highway. This marks a steep turnoff that leads to Elk Park Pullout. Please be extremely cautious if you take this turn. The road is very steep and drivers often can’t see over their car hood to ensure no one else is coming up this single-lane dirt road. If your vehicle has a long wheelbase, you may want to avoid this turn entirely as it is difficult to rejoin the highway without backing up on the return from Elk Park Pullout.
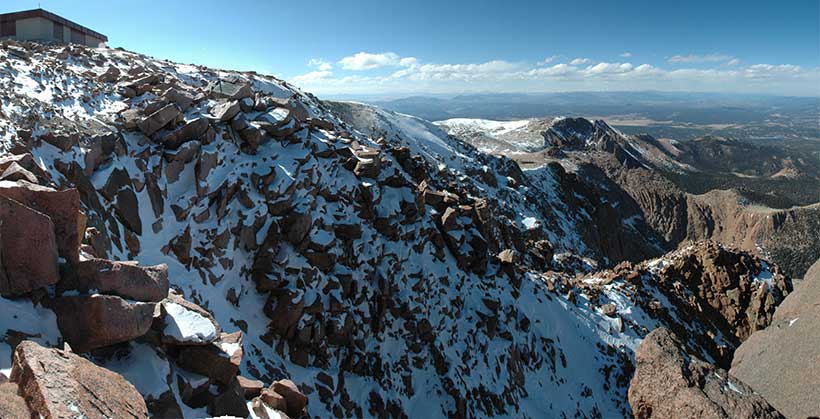
Tree line on Pikes Peak is reached at about Mile Marker 14, and the scenery is just divine. It’s also almost the start of several switchbacks called the “Ws,” so named because if you look at the road from above, it looks like a W.
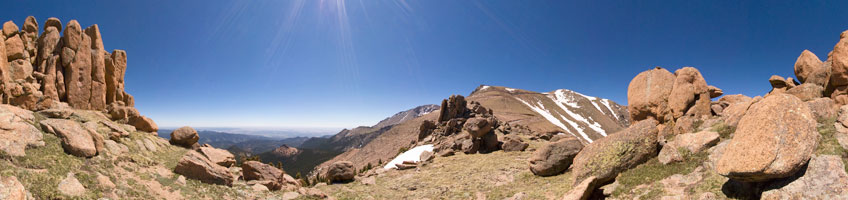
Panorama taken from above the first “W” on the Pikes Peak Highway
The first set of Ws starts around the 14.5 mile point. Once you make the first leg of the first W, you’ll see an assortment of rocks on the left, followed by a small pullout for parking. The views from that location (see photo below) are the first of many outstanding panoramas that await you.
The Switchbacks viewed from above on the Pikes Peak Highway.
Soon after, you’ll start on the second set of Ws and even more great views. If you’re afraid of heights, this probably isn’t going to be the best place for you. However, the highway is much safer now that it used to be. This section of the road (all the way to the top) has now been paved, and it has many more guardrails than previously. Apparently, “Real Men do need Guardrails.”
As you continue the climb to the summit, you’ll soon approach Devil’s Playground at Mile Marker 16. A sign on the left side of the road tells travelers that it was named this because of the way lightning jumps from rock to rock during storms. Parking is available on the left side of the highway.
Previously, most of your views have been of the north side of Pikes Peak. However, now you can view the south and southwest side of the mountain. And, if you look closely, you might be able to catch a glimpse of the Summit House from several spots in the miles ahead.
Just before Mile Marker 17, you’ll see a pullout on the left side of the road. That’s Bottomless Pit, a seemingly endless drop into a very deep abyss. The view is amazing – not just of the Bottomless Pit but also the view straight out. We suggest you stop for a look on the way down the mountain. On the right side of the Highway at this same location is Sheep Basin. (See photo below)

Panorama of Sheep Basin on the Pikes Peak Highway
The road starts to climb again as you continue through the next couple of miles. On your left will be a smaller hill called Little Pikes Peak.
Just after Mile Marker 18, you’ll find a pullout on the right that has interpretive materials about Colorado’s State Mammal, the Rocky Mountain Bighorn Sheep. The location for this material is great since many sheep are seen in this area every year, especially on the upcoming hillside to your left.
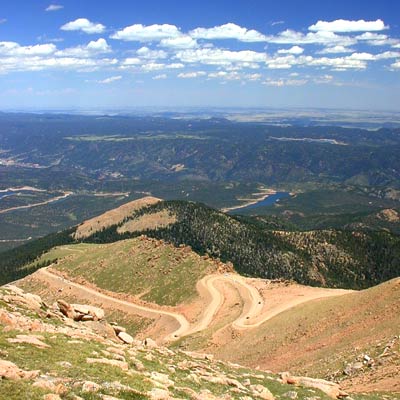
Okay. You’re almost there! Only another mile to go! The highway wraps around the south side of Pikes Peak at this point, providing another set of outstanding panoramas. To the southwest, you can see Cripple Creek and the gold mines at Victor. Further south and west are the Sangre de Cristo Mountains, which extend in to New Mexico. At the next switchback, you’ll see the tracks for the Cog Railway straight head. If your timing is good, you may even see the train itself.
Views to the west near the summit of Pikes Peak
At the next switchback is probably one of the best western views from the mountain. As you look out, you’ll see the road you just drove as it winds from Devils Playground and around Little Pikes Peak. In the distance, you can see Mueller State Park, Buena Vista, Spinney Mountain, Crystal, the Collegiate Peaks and, on a clear day, even Aspen, Leadville and Breckenridge.
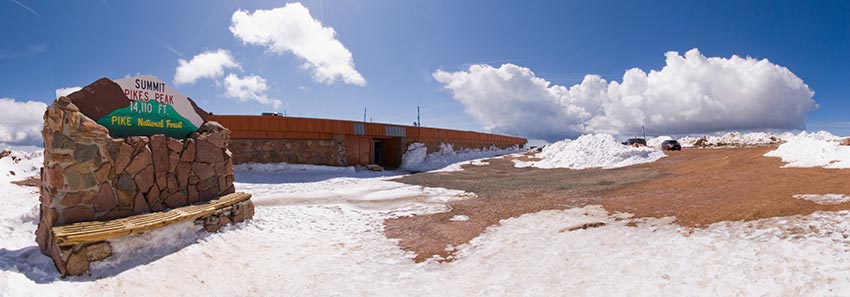
Head another 1,000 feet up the road and you’ll reach the Summit of Pikes Peak!
As you arrive, the first building you’ll see is a small structure on the right. That building houses instrumentation and a weather station. On top of that structure is also the Panoramic Pikes Peak Web cam, which sends images to the City of Colorado Springs Web site every 10 minutes.
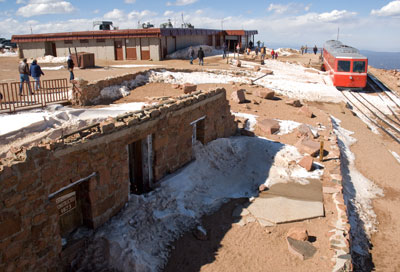
Currently, there is a significant construction effort occurring to build a new, world class visitor center on the summit of Pikes Peak. Work is expected to continue through 2022. However, you can bypass most of the mess by driving forward to the existing Summit House, which is up on your left. Parking is limited, so grab one that looks good and continue your exploration of the summit on foot.
On the other (east) side of the Summit House, you’ll see the tracks for the Pikes Peak Cog Railway. Look to the sorth to see what’s called The Crater, a deep drop off that may resemble a volcano crater to some. To the east, you’ll be able to see the Manitou Springs, Colorado Springs and Garden of the Gods in the distance. The uppermost trailhead for Barr Trail can be found across the tracks.
Wall from the original summit house and a cog train.
If you walk down hill along the cog railway, you may be able to see a wall from the original Summit House, which was built in 1892. (see photo to the left.) However, they may have it protected in an enclosure during the construction.
As you make your way around the building to the north, you’ll be able to see the Rampart Range, Crystal Reservoir and North and South Catamount Reservoirs, up to Woodland Park. Immediately off the northern edge of the summit is what early photographers call the Abyss of Desolation, another deep drop-off from the 14,000 foot pinnacle on which you’re standing. Please watch your step!
The Abyss of Desolation, from the Summit of Pikes Peak
Continue around the Summit House and you’ll find a bench and sign that provides an excellent opportunity for travelers to prove their ascent to the top of Pikes Peaks.
The west side of the Pikes Peak Summit House after late snow in May.
You’ve now circled the Summit House at 14,115 feet above sea level! You may want to take this opportunity to enter the Summit House and pick up a world-famous donut or have lunch, and select from the hundreds of mementos to commemorate your trip.
Once you depart from the Summit House, take the opportunity to walk or drive to the other side of the summit where the Army’s High Altitude Research Center is located. The center is closed to visitors, however, there are plenty of good views as you round out your visit to the summit.
As you leave the summit of Pikes Peak, please obey all road signs – especially the two that tell you not to ride your brakes and to put your car in its lowest gear.
Though you drove up to the summit on this same highway, you’ll still be blessed with new views on the way down. Please take your time and enjoy the downhill trip. And, don’t forget to stop at the overlooks and pullouts you missed on the way up, especially Camera Point near Mile Marker 2.